Using Claude Desktop and Claude Code on Windows
This is the Windows edition of Claude Desktop Integration. It starts from installing cc-router and ends with model-opus and the other virtual models showing up in Claude Desktop’s model picker. Claude Desktop’s Cowork and Code tabs share the same gateway configuration. If you only use the Claude Code CLI, jump straight to Claude Code CLI — no HTTPS required.
Prerequisites
- Windows 10 / 11 (x64 or arm64)
- Claude Desktop installed
- At least one account and API key with a supported model provider
- Administrator privileges to import the certificate (you’ll get a UAC prompt)
Two deployment options
cc-router can run on the same Windows machine as Claude Desktop, or on another machine on your LAN (say, an always-on Mac mini) with Windows acting purely as the client. The two setups differ only in the address and the certificate:
| Same Windows machine | cc-router on another machine | |
|---|---|---|
| Gateway base URL | https://127.0.0.1:23457 | https://<LAN IP of the cc-router machine>:23457 |
| cc-router Listen address | Loopback only (default) | Switch to LAN |
| Extra SANs | Leave empty | Add the LAN IP of the cc-router machine |
| Where the CA comes from | Export and import on this machine | Export on the cc-router machine, copy to Windows, import there |
The rest of this guide follows the same-machine setup; extra steps for the LAN setup are called out in note boxes.
Step 1: Install cc-router on Windows
Download the installer for your architecture. Both download sources serve identical files; in mainland China, the China mirror is faster:
| Architecture | Installer | Download |
|---|---|---|
| x64 | cc-router_windows-x64-setup.exe | Global · China mirror |
| x64 (MSI) | cc-router_windows-x64.msi | Global · China mirror |
| arm64 | cc-router_windows-arm64-setup.exe | Global · China mirror |
For a personal PC, use setup.exe; use the .msi when you need to roll it out via Group Policy or a software distribution tool. Double-click to run the installer wizard.
SmartScreen warning: if you see “Windows protected your PC”, click More info → Run anyway.
On first launch, cc-router walks you through onboarding: add a subscription → bind virtual models → choose a dispatch mode. See Getting Started for details.
Quitting and restarting: closing the cc-router window leaves it running in the system tray. Whenever this guide says “restart cc-router”, right-click the tray icon in the bottom-right of the taskbar → Quit cc-router, then launch it again — don’t just close the window.
Step 2: Enable HTTPS
Claude Desktop’s third-party inference gateway only accepts HTTPS endpoints. Open cc-router → Settings → Proxy service:
- Set Listen protocol to
HTTP + HTTPS(recommended — the Claude Code CLI can keep using HTTP) orHTTPS only - HTTPS port defaults to
23457and auto-increments if it’s taken - Quit cc-router from the tray and reopen it so the new settings take effect
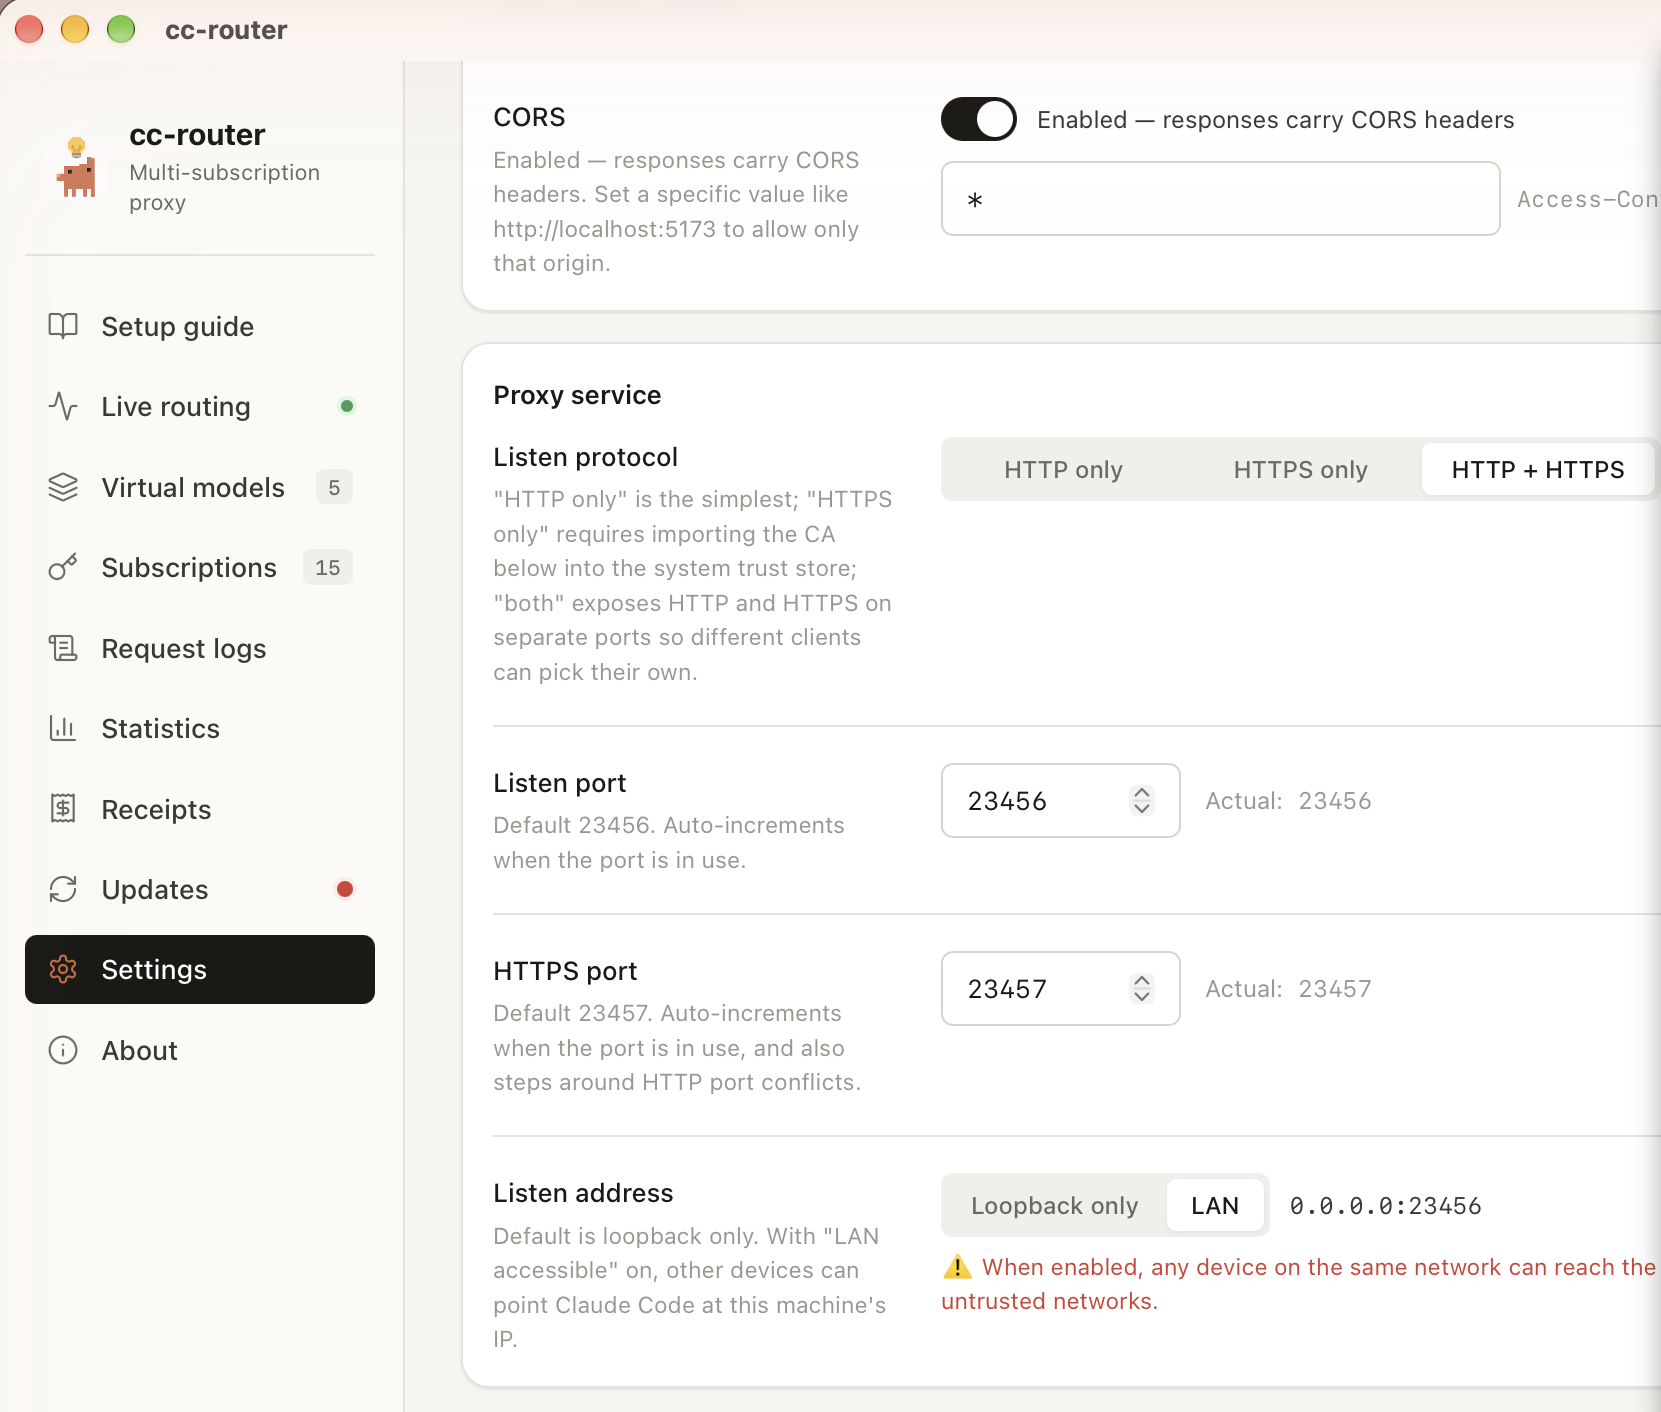
cc-router on another machine: on the same page, switch Listen address from Loopback only to LAN, then add that machine’s LAN IP (e.g.
192.168.1.5, one per line) under HTTPS certificate → Extra SANs. The server certificate is re-signed automatically when the field loses focus. Takes effect after a restart.
Step 3: Export the CA certificate
Settings → scroll to HTTPS certificate → click Export CA certificate… and pick a folder. cc-router writes two files with identical contents, .pem and .crt. Use the .crt on Windows — double-clicking it opens the certificate install wizard directly.
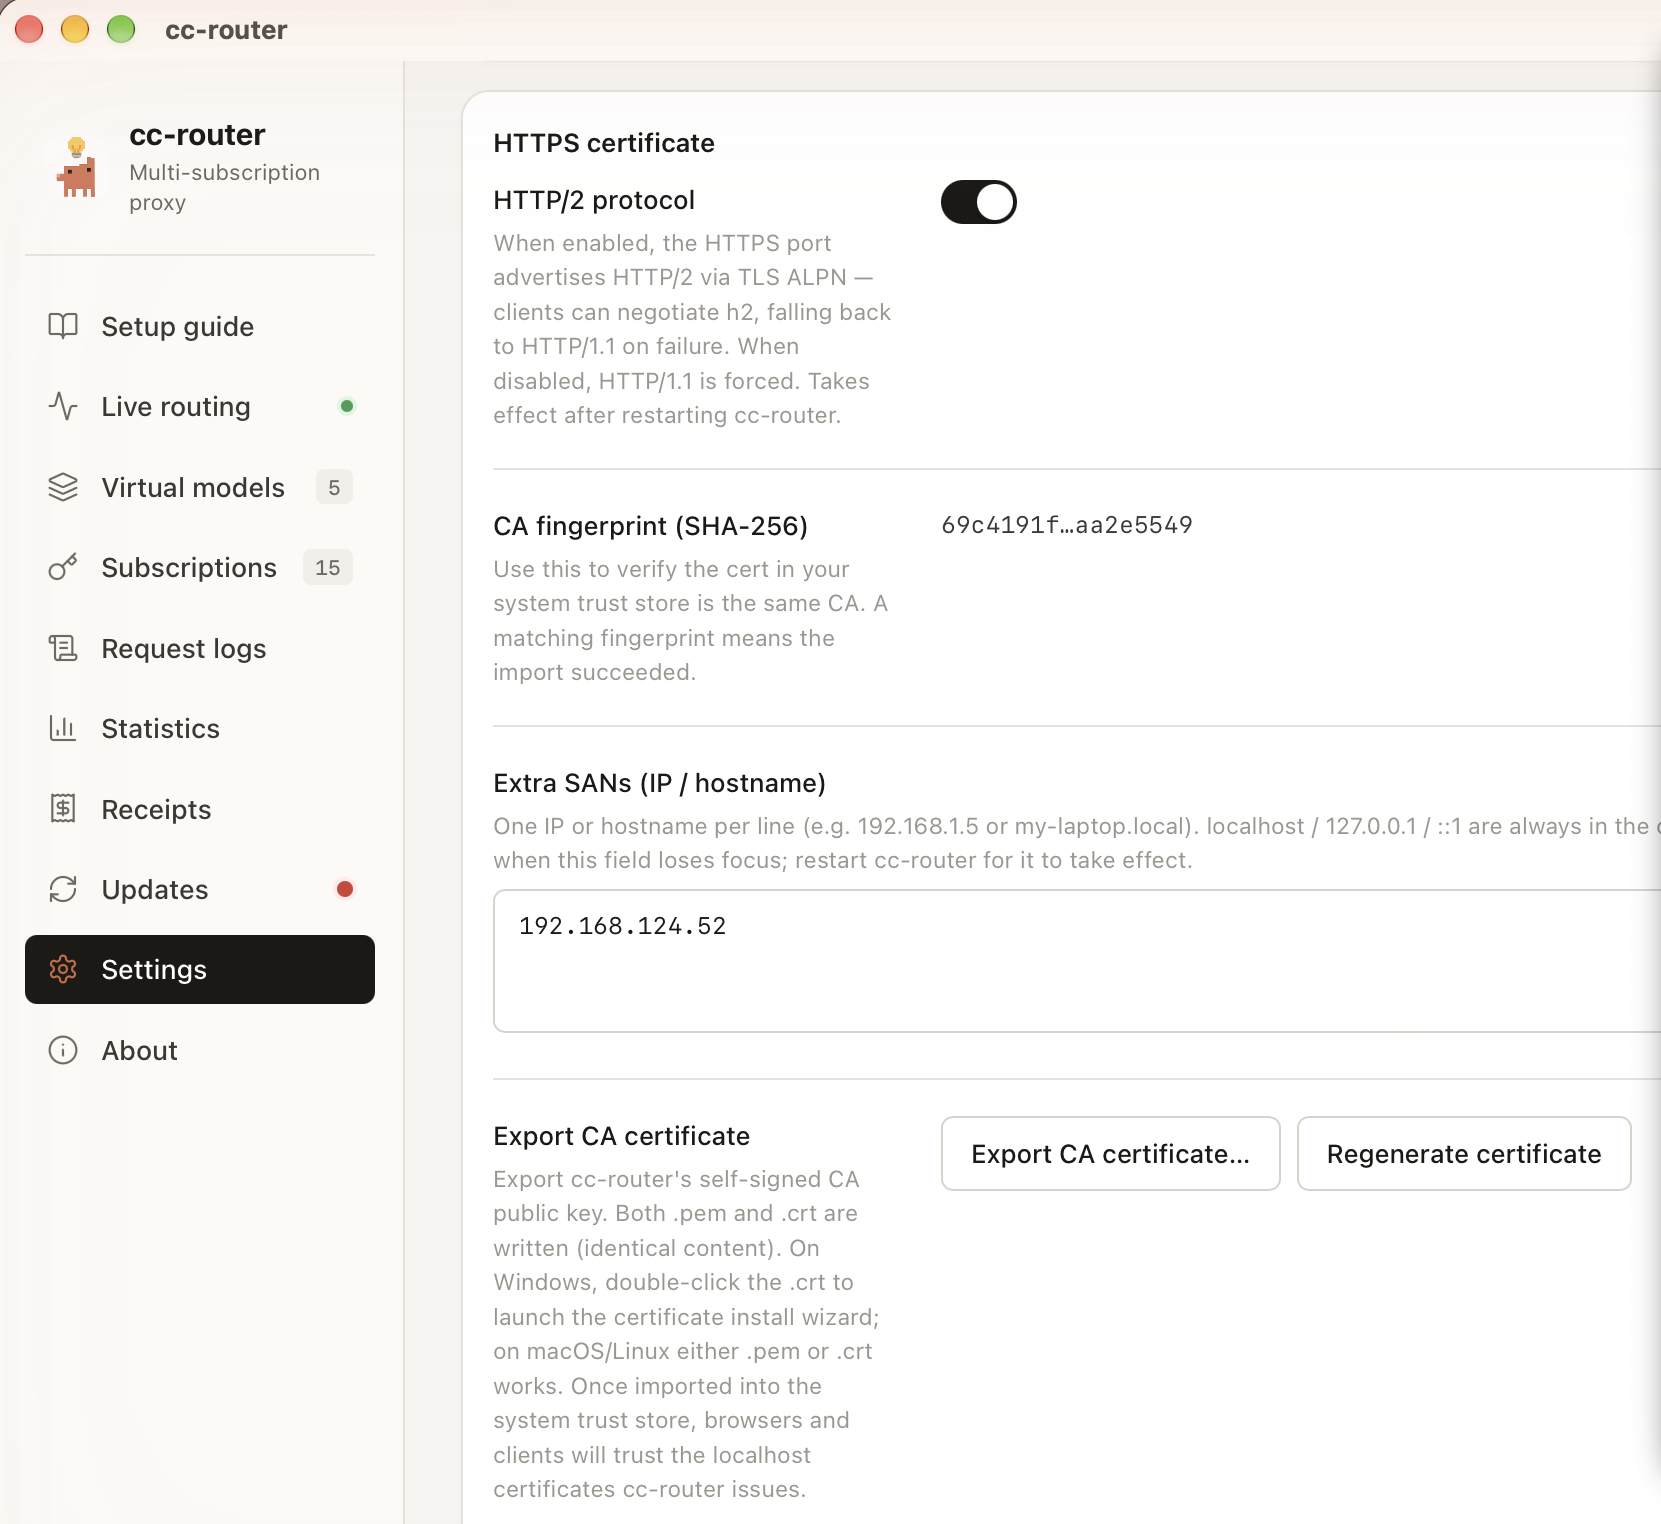
cc-router on another machine: export on that machine, then copy the
.crtfile to Windows (USB stick, cloud drive, or LAN share all work). Copy only the CA — no private key is needed.
Step 4: Import the CA into Trusted Root Certification Authorities
This step decides whether Claude Desktop trusts cc-router’s HTTPS endpoint, and it’s where things most often go wrong on Windows.
1. Open the certificate and click “Install Certificate…”
Double-click the .crt file. The Certificate window warns “This CA Root certificate is not trusted…”, and both Issued to and Issued by read cc-router local CA. Click Install Certificate… at the bottom left.
2. Choose “Local Machine” as the store location
In the Certificate Import Wizard, select Local Machine, click Next, and click Yes on the UAC prompt.
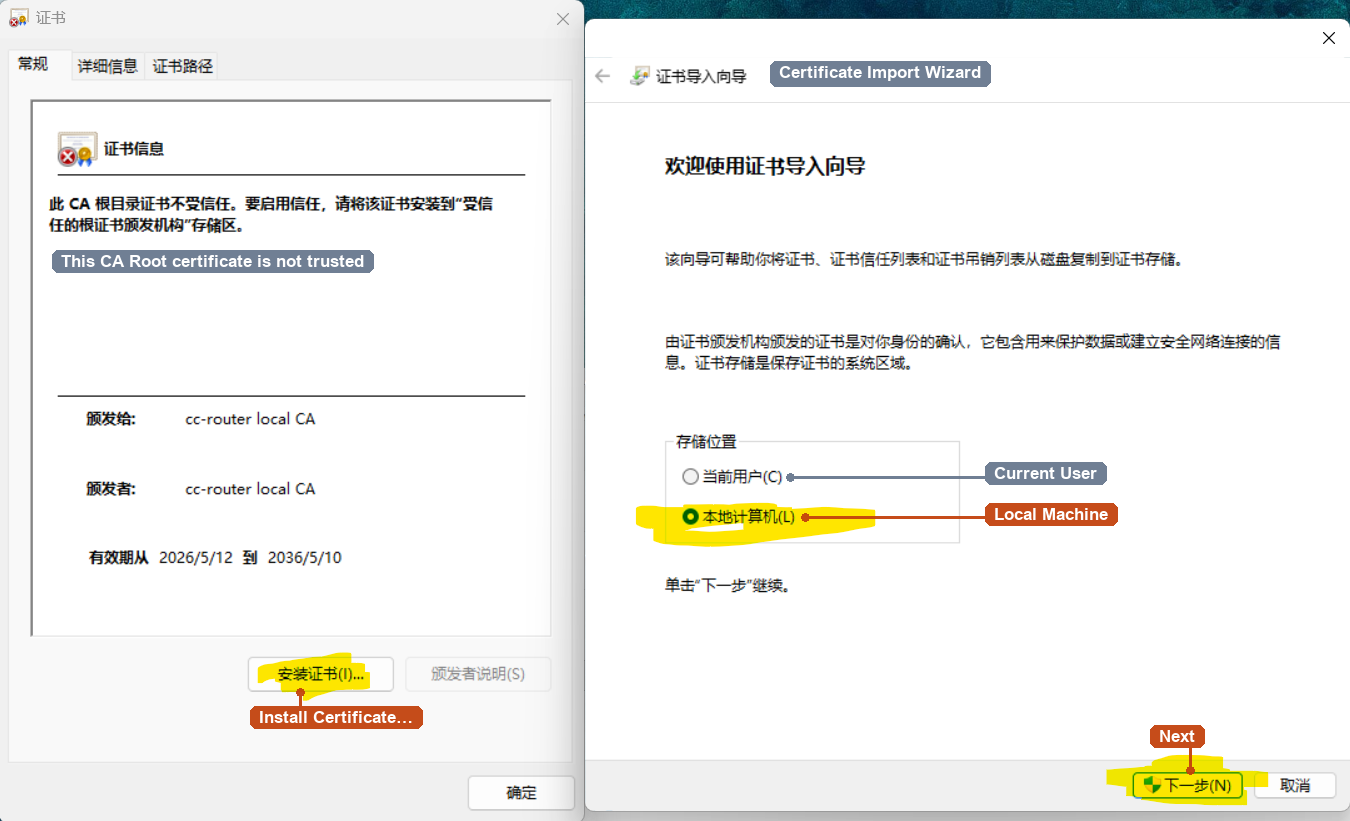
Choose Local Machine. Installed there, the CA is trusted by every user and every program on this PC. If you install it only for Current User, you can end up with the browser working fine while Claude Desktop still reports a certificate error.
3. Place it in “Trusted Root Certification Authorities” manually
Select Place all certificates in the following store → click Browse… → pick Trusted Root Certification Authorities from the list → OK → Next → Finish. You’re done when you see “The import was successful.”
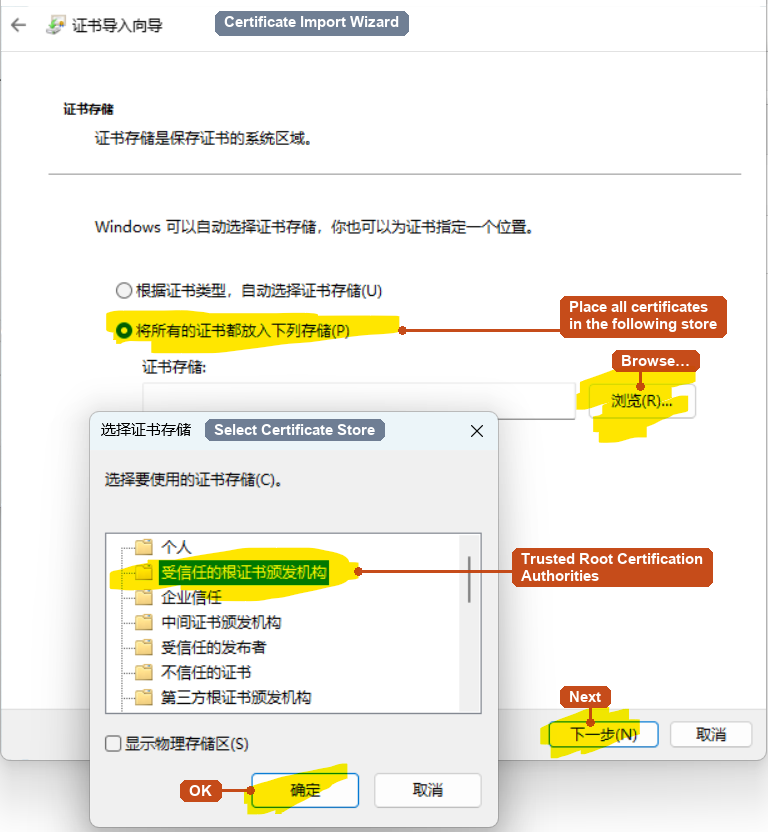
Don’t choose Automatically select the certificate store based on the type of certificate. Automatic selection doesn’t guarantee the CA lands in Trusted Root Certification Authorities, so you can get an “import successful” message while the certificate is still untrusted. Picking the store manually is the safe choice.
4. Verify the import
Double-click the .crt again. If the General tab no longer shows the “not trusted” warning, the import worked. You can also press Win + R, run certlm.msc to open the Local Machine certificate manager, and find cc-router local CA under Trusted Root Certification Authorities → Certificates.
Import from the command line (optional)
If you prefer the command line, run this one-liner in an elevated (Run as administrator) PowerShell. It does the same thing as the wizard above:
Import-Certificate -FilePath .\cc-router-ca.crt -CertStoreLocation Cert:\LocalMachine\RootStep 5: Enable Developer Mode in Claude Desktop
Open Claude Desktop. You don’t need to sign in first — everything below can be done from the sign-in screen.
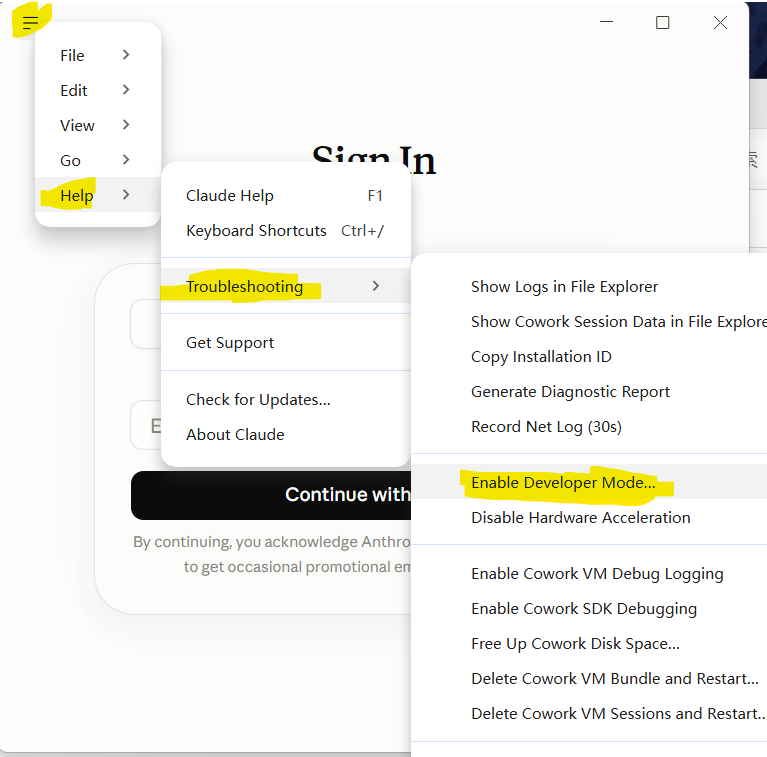
Click the ≡ menu at the top left of the window → Help → Troubleshooting → Enable Developer Mode…
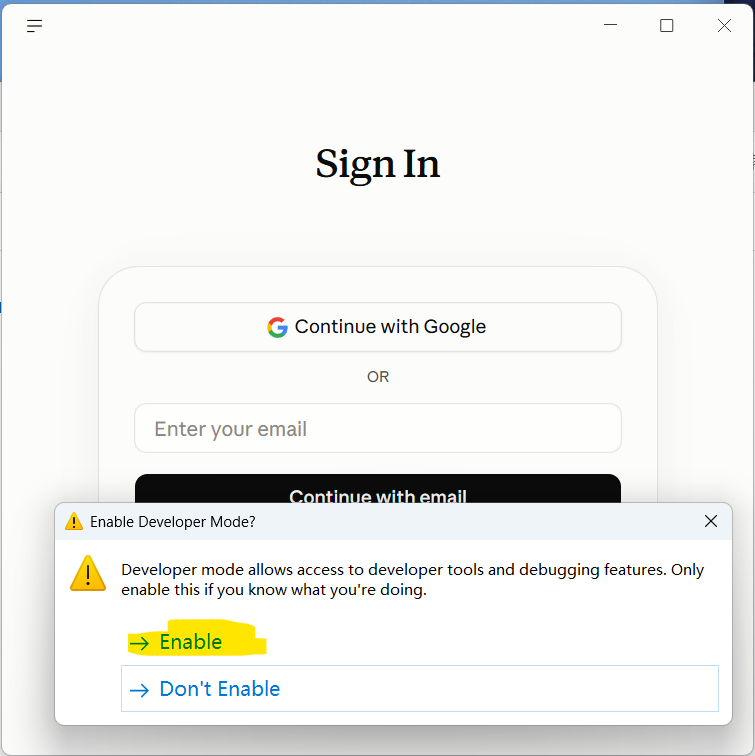
Click Enable in the confirmation dialog.
Step 6: Open the third-party inference settings
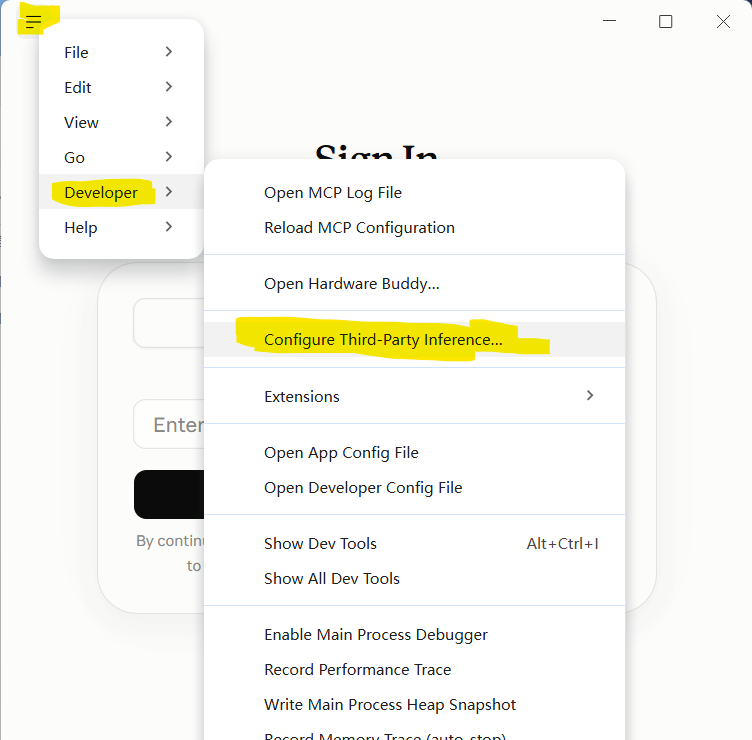
Once developer mode is on, a Developer entry appears in the ≡ menu. Click ≡ → Developer → Configure Third-Party Inference…
Step 7: Configure the gateway and test the connection
In the Configure third-party inference window, select Connection on the left, choose Gateway in the dropdown at the top, then fill in the GATEWAY CREDENTIALS section:
| Field | Value |
|---|---|
| Credential kind | Static API key |
| Gateway base URL | Same machine: https://127.0.0.1:23457LAN: https://<cc-router machine IP>:23457Use the actual port shown under HTTPS port in cc-router’s Settings page |
| Gateway API key | The token from cc-router Settings → Authentication & CORS |
| Gateway auth scheme | bearer |
Leave the remaining fields (Artifact preview iframe origin, Custom inference headers, Stream idle timeout, etc.) at their defaults.
Click Test connection at the top right first. When it connects, green messages appear at the bottom:
- Model discovery — found 16 models: Claude Desktop pulled 16 Anthropic-style model names from cc-router’s
GET /v1/models. (cc-router actually returns 30; Claude Desktop filters out the other 14gpt-*entries. This is expected.) - Inference — 1-token completion in … ms (model-haiku): a real inference round-trip succeeded on
model-haiku
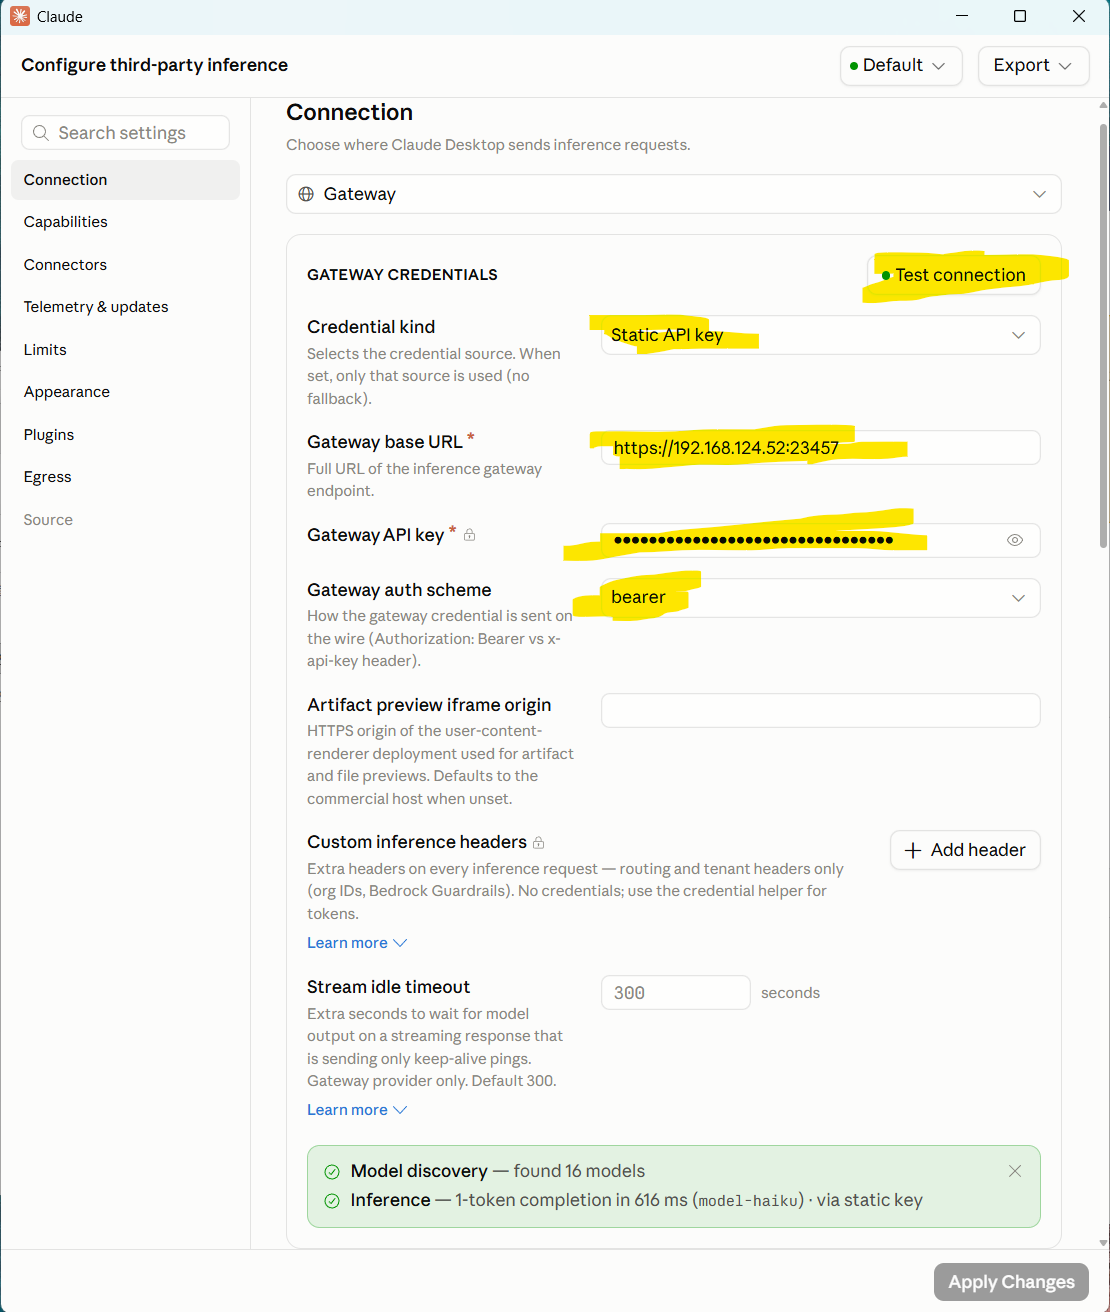
Once the test passes, click Apply Changes at the bottom right to save.
Step 8: Pick a model and start using it
After saving, Claude Desktop switches to Gateway mode and shows <computer name> · Gateway at the bottom left. Send a message in Cowork to try it out:
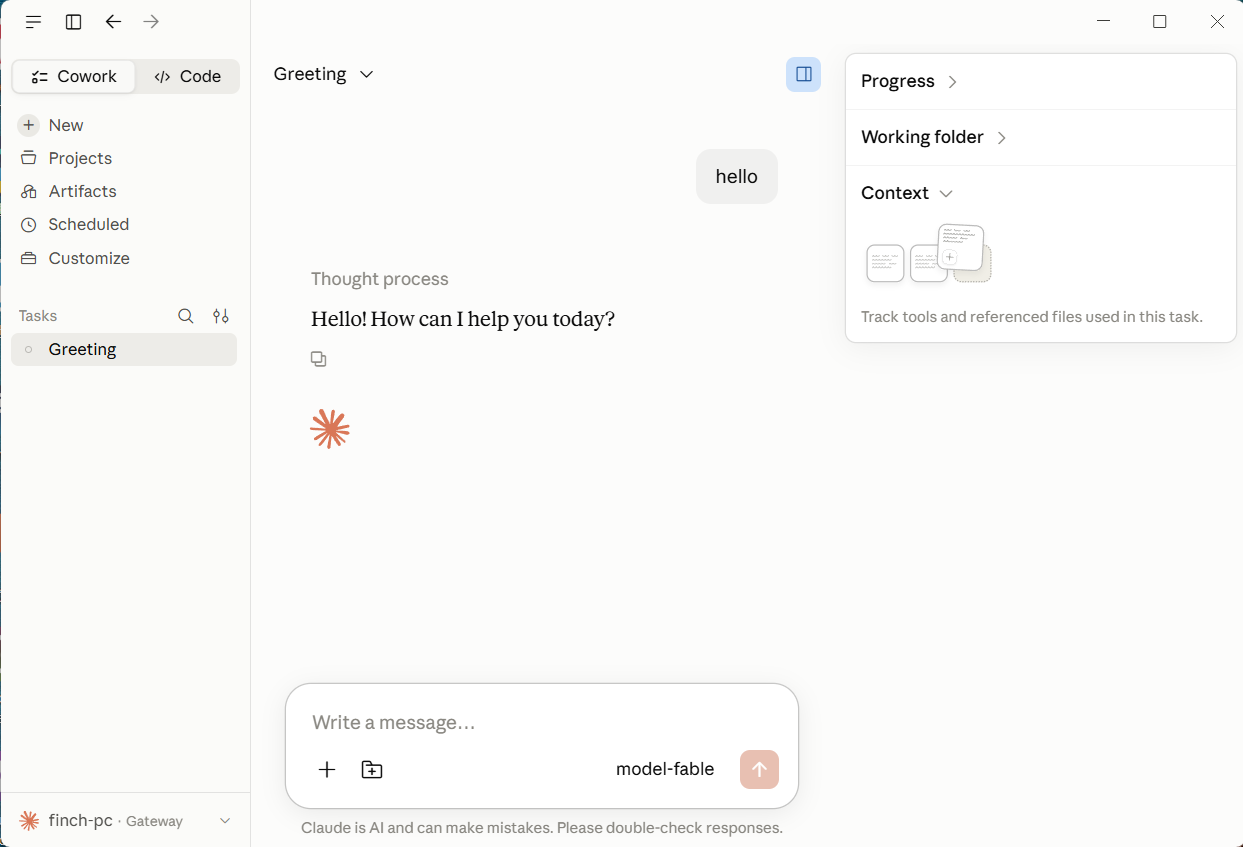
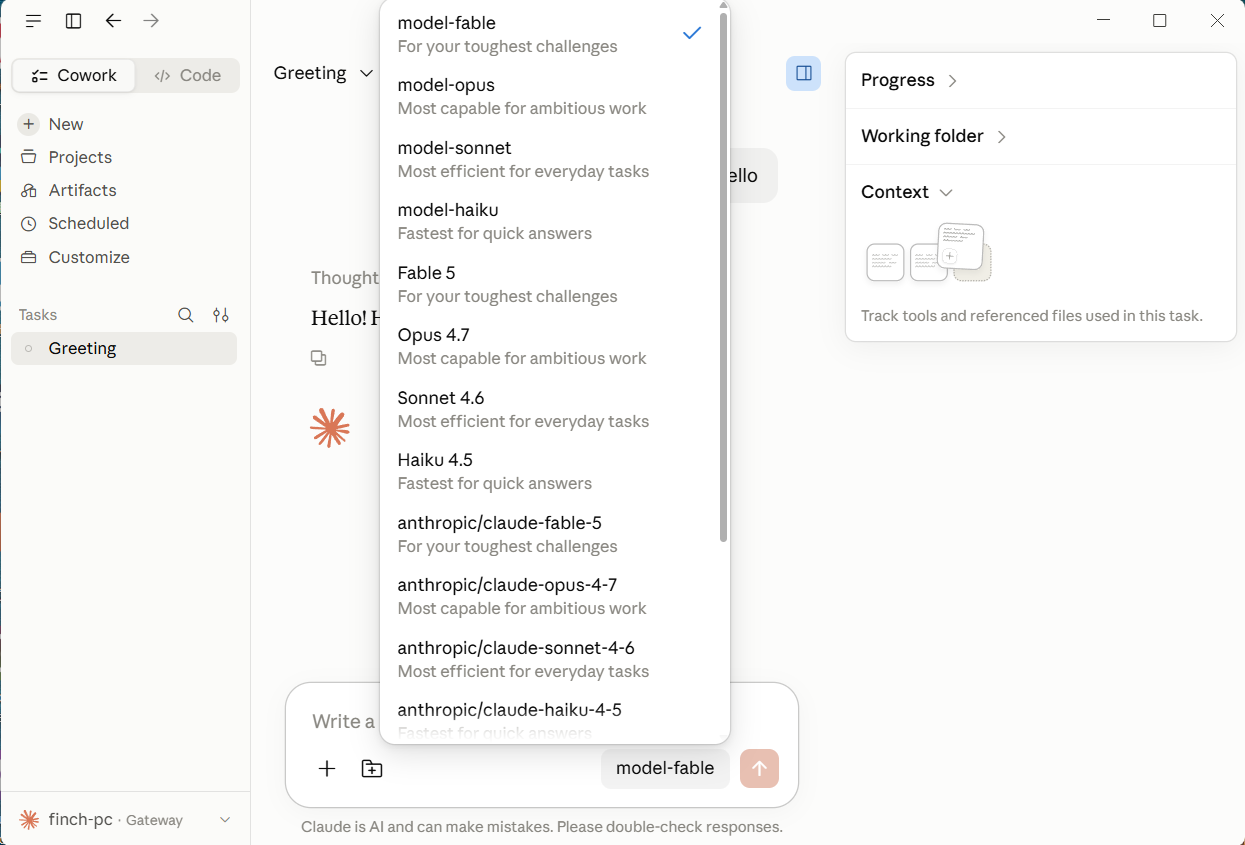
Click the model name to the right of the input box to switch models. The different names in the list all end up in cc-router’s four virtual slots:
| Name in the list | Actually routed to |
|---|---|
model-fable · Fable 5 · anthropic/claude-fable-5 | model-fable slot |
model-opus · Opus 4.7 · anthropic/claude-opus-4-7 | model-opus slot |
model-sonnet · Sonnet 4.6 · anthropic/claude-sonnet-4-6 | model-sonnet slot |
model-haiku · Haiku 4.5 · anthropic/claude-haiku-4-5 | model-haiku slot |
We recommend picking the model-* names: you can tell at a glance which slot you’re on, and you won’t mistake them for Anthropic’s official models.
The Code tab at the top left (Claude Code in the desktop app) uses the same gateway configuration — nothing else to set up.
Verify
In cc-router’s main window, go to Request logs → Requests in the left sidebar and start a conversation. A new entry should appear, with the Virtual model and Real model columns showing the actual routing. Open the details and Entry endpoint should read /v1/messages.
Both Cowork and Code are built on Claude Code under the hood, so the Client column may show Claude Code. This is expected.
Claude Code CLI
Using the Claude Code CLI on Windows (claude in PowerShell, Windows Terminal, or the VS Code terminal) requires no HTTPS and no certificate — just use the HTTP port:
- cc-router → Setup guide → Claude Code, click Insert cc-router recommended config → Save. cc-router writes to
%USERPROFILE%\.claude\settings.jsonwithout overwriting your existing settings. - Fully exit every Claude Code session, then run
claudeagain.
For details and the exact fields written, see Claude Code Integration. If you’d rather edit by hand, open %USERPROFILE%\.claude\settings.json and fill in the env snippet from Getting Started, using http://127.0.0.1:23456 for ANTHROPIC_BASE_URL.
Troubleshooting
- Test connection fails with a certificate error (
unable to verify the first certificate,self-signed certificate, etc.) — the CA isn’t in Trusted Root Certification Authorities under Local Machine. Check withcertlm.msc. Common causes: it was installed for Current User, or automatic store selection put it somewhere else. Re-import following Step 4, then fully quit and restart Claude Desktop. Hostname/IP doesn't match certificate— the IP in the Gateway base URL isn’t in the certificate’s SANs. Add it to Extra SANs in cc-router and restart cc-router. The CA hasn’t changed, so Windows does not need to re-import it.- Connection timeout /
connection refused— check in order: is cc-router running; does Listen protocol include HTTPS; does the port match the actual port shown in Settings; in the LAN setup, is Listen address set to LAN. - Can’t connect in the LAN setup — if cc-router runs on another Windows machine, the first time you switch to LAN Windows Firewall may ask for permission. Allow cc-router on Private networks. If you missed the prompt, go to Windows Security → Firewall & network protection → Allow an app through firewall and tick it manually.
401 Unauthorized— the token may have been regenerated in Settings. Copy it into Gateway API key again and rerun Test connection.- No Developer menu — developer mode didn’t get enabled. Go back to Step 5 and make sure you clicked Enable in the dialog.
Security notes
- The Gateway API key is effectively a credential for all your upstream subscriptions. Don’t leak it, and don’t share unredacted screenshots of the configuration window.
- What you imported is a root CA generated by cc-router on your machine; it can issue certificates for any domain that Windows will trust. Only import a CA you exported from your own machine — never import a
cc-router-ca.crtsomeone sends you. When you no longer need it, deletecc-router local CAincertlm.msc. - With LAN enabled, any device on the same network can reach the proxy port. Keep Token authentication on and use it only on trusted networks.