Claude Desktop Integration
This page walks you through wiring cc-router into Claude Desktop so the app can call your aggregated virtual models — model-opus, model-sonnet, model-haiku — over cc-router’s HTTPS gateway.
Prerequisites
- cc-router installed and configured with at least one virtual model bound (see Getting Started)
- Claude Desktop installed
- This guide uses loopback (127.0.0.1) as the primary example. If Claude Desktop and cc-router run on different machines (LAN setup), pay extra attention to the Extra SAN note in Step 2 and the URL template in Step 5.
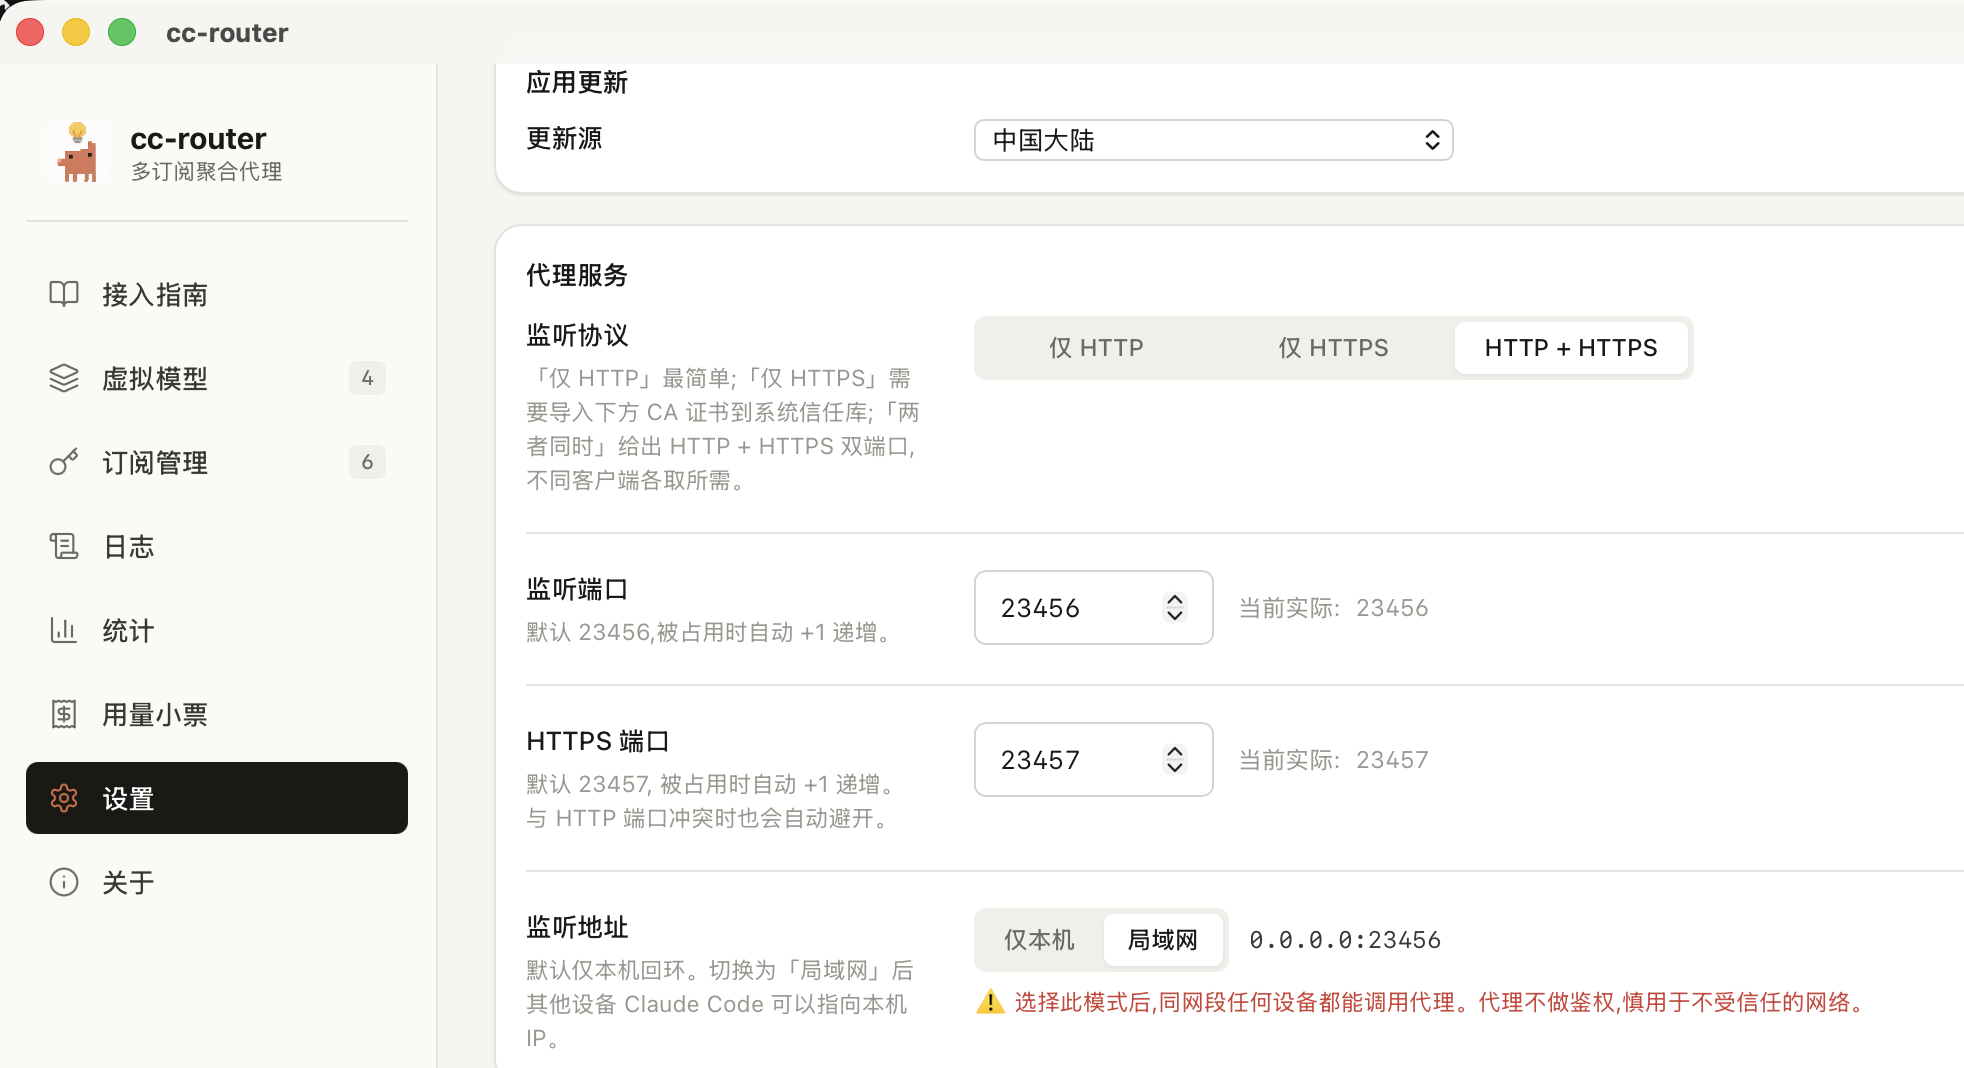
Step 1: Enable HTTPS in cc-router
Claude Desktop’s third-party inference gateway only accepts HTTPS endpoints, so start by exposing cc-router’s HTTPS listener.
Open cc-router → Settings → Proxy service → set Listen protocol to HTTPS only or HTTP + HTTPS → fully quit and restart the app (required — the protocol switch does not hot-reload).
The HTTPS port defaults to 23457 and auto-increments if it’s taken. Always trust the Actual listening port shown at the bottom of the Settings page.
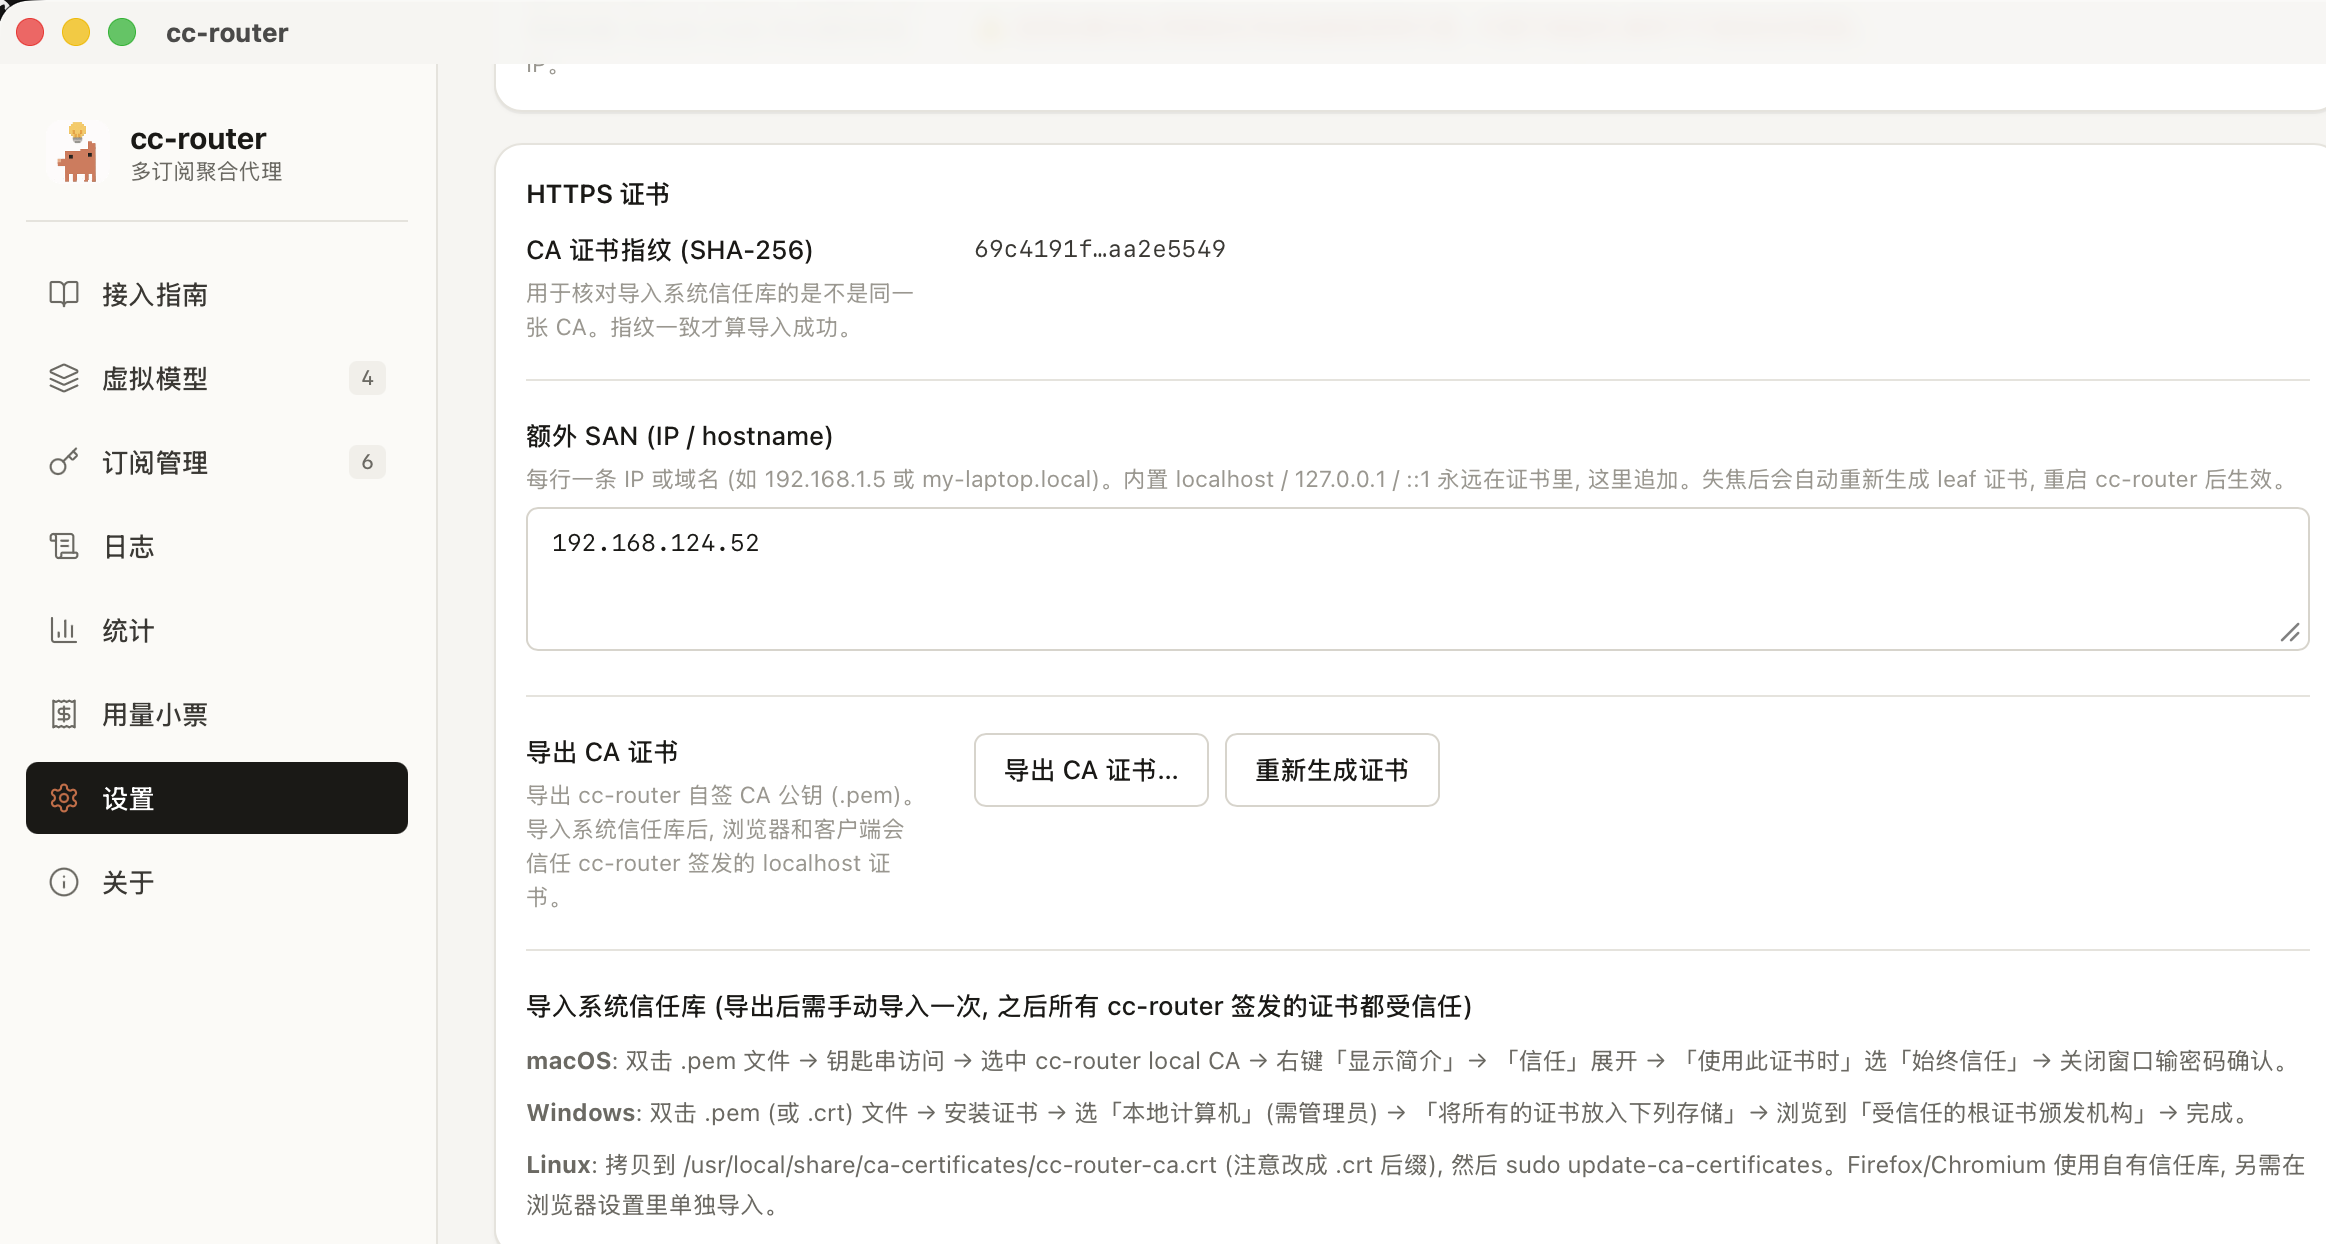
Step 2: Export the CA Certificate
cc-router signs leaf certificates with a locally-generated CA. For Claude Desktop to trust the HTTPS endpoint, install this CA into your OS trust store first.
In Settings, scroll to the HTTPS certificate section → click Export CA certificate… → save it as cc-router-ca.pem (you can rename to .crt if preferred).
Verify the fingerprint: note the CA fingerprint (SHA-256) shown above the export button. After importing on the OS side, cross-check the fingerprint to confirm it’s the same CA.
LAN multi-machine access: if Claude Desktop will reach cc-router from a different machine, add the access IP or hostname to the Extra SAN textbox first (one per line). The leaf certificate auto-re-signs on blur — restart the app, then export the CA. The CA itself does not change, so previously distributed CAs stay valid.
Step 3: Trust the CA on Your System
macOS
Double-click the .pem file. Keychain Access prompts to add it — choose System as the keychain and click Add.
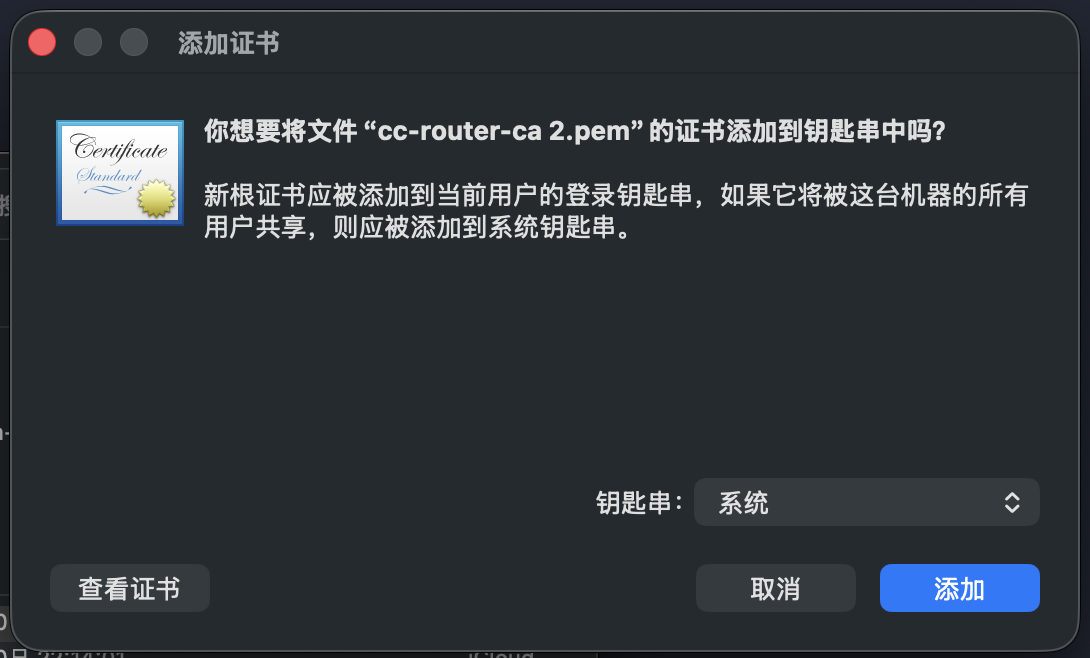
macOS asks for permission to modify the system keychain. Use Touch ID or enter your password.

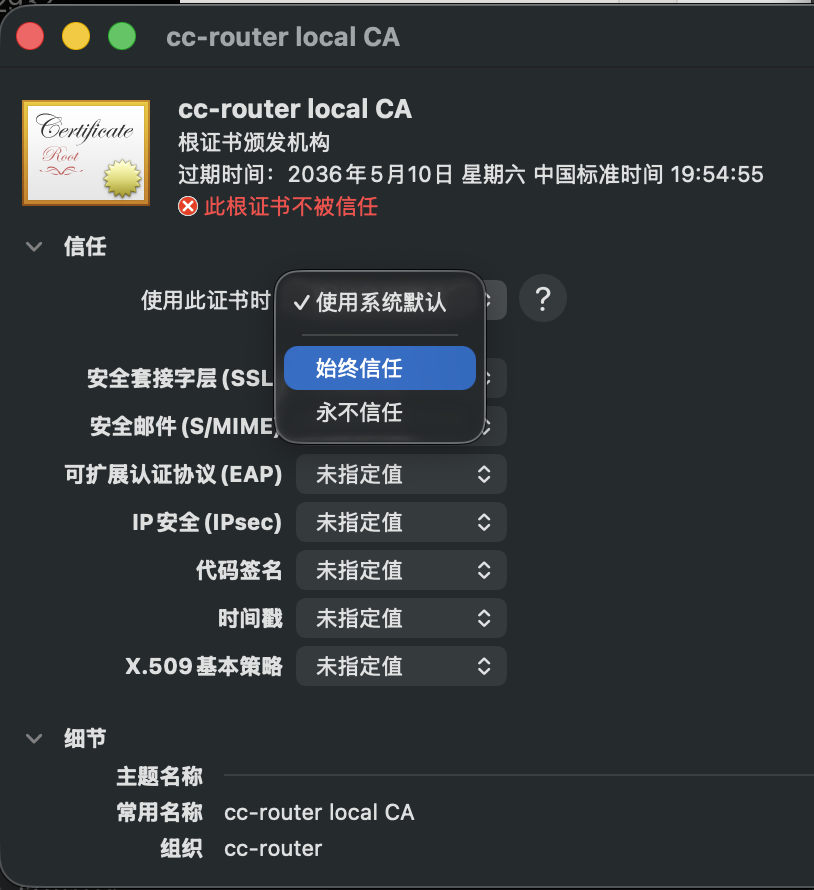
Back in Keychain Access, find cc-router local CA under System and double-click it.
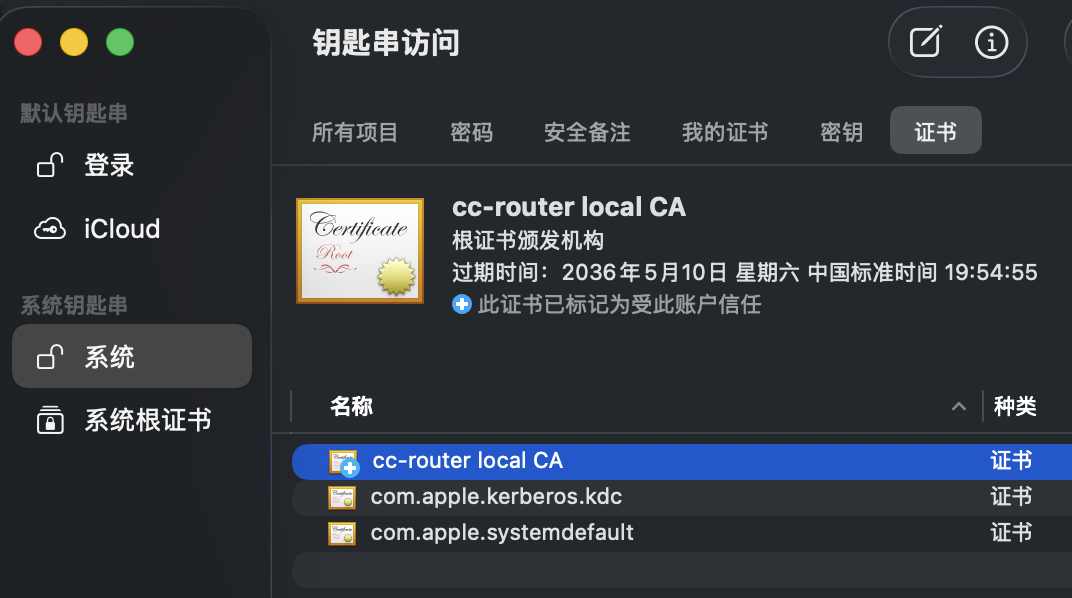
Expand the Trust section, change When using this certificate to Always Trust, then close the window and enter your password again to confirm.
Windows
Double-click the .pem or .crt → Install Certificate → choose Local Machine (requires administrator privileges) → Place all certificates in the following store → browse to Trusted Root Certification Authorities → Finish.
Linux
The file extension must be .crt:
sudo cp cc-router-ca.crt /usr/local/share/ca-certificates/
sudo update-ca-certificates
Firefox and Chromium maintain their own certificate stores — you may need to import the CA into each browser separately.
Step 4: Enable Developer Mode in Claude Desktop
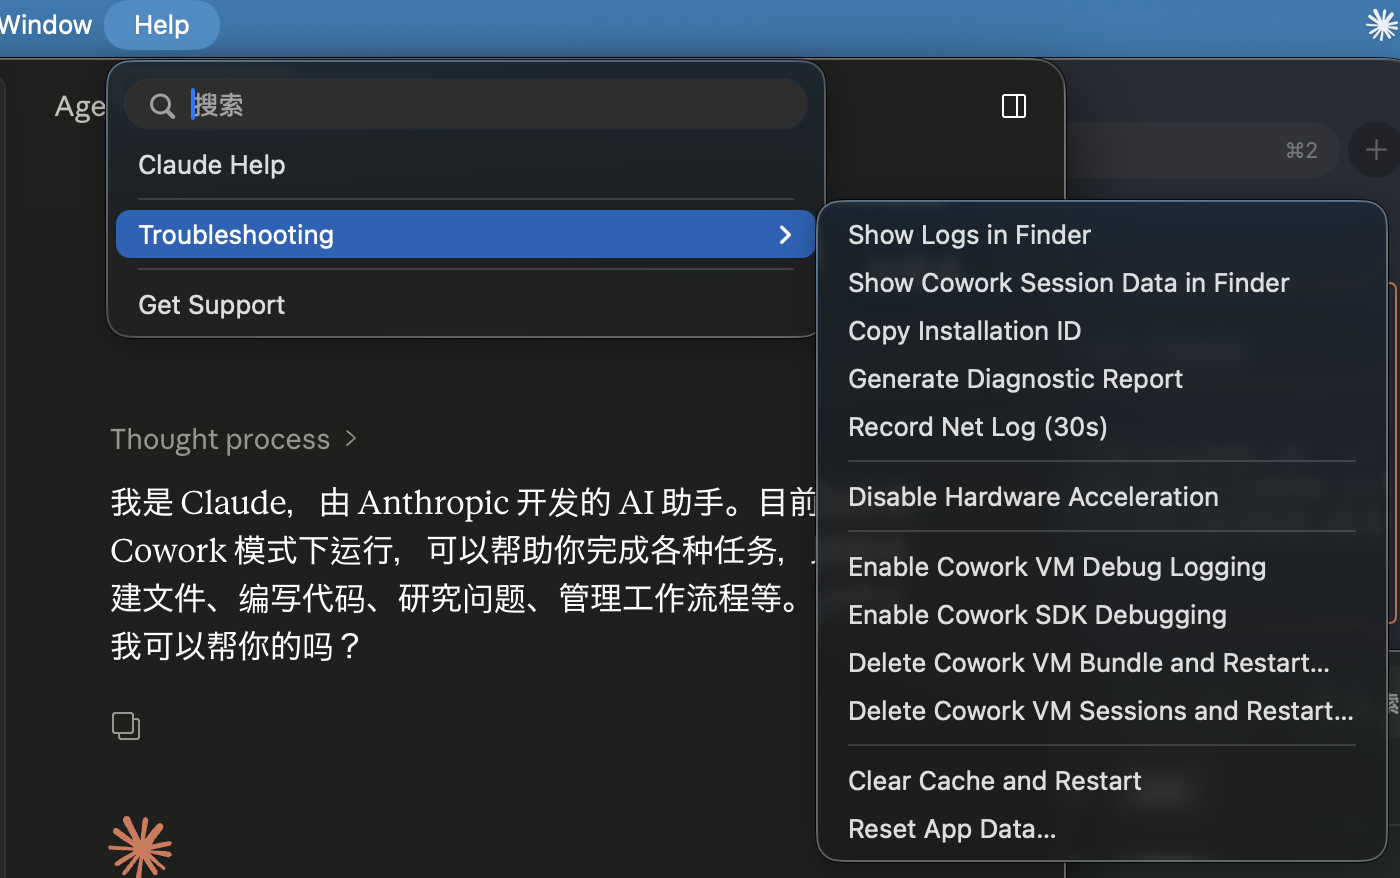
Open Claude Desktop → top-level Help menu → Troubleshooting submenu → enable the developer-mode option (the exact label may vary by Claude Desktop version — use the screenshot below as a positional reference) → restart Claude Desktop when prompted.
After the restart, a Developer menu appears in the menu bar.
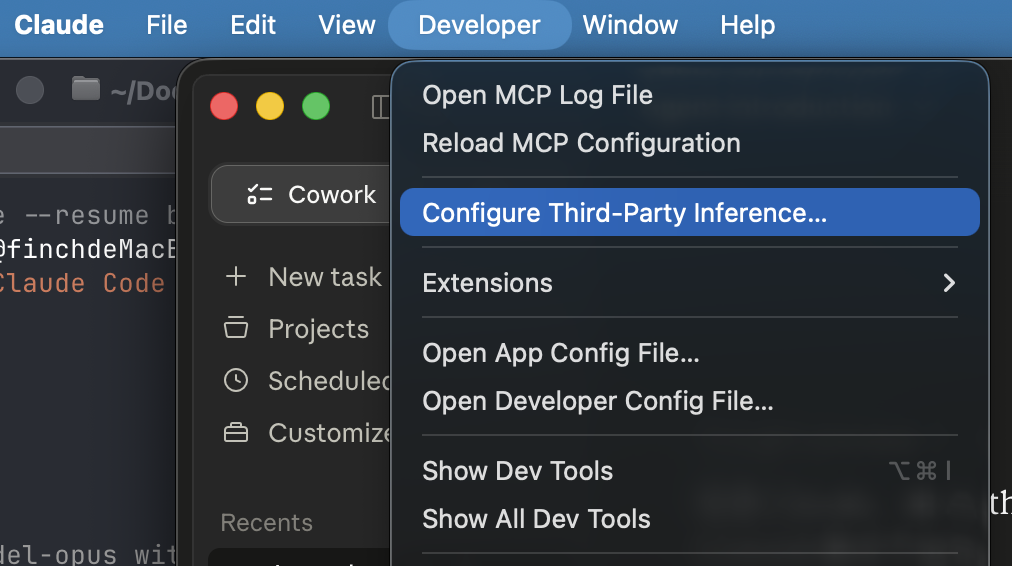
Step 5: Configure the Third-Party Inference Gateway
Enabling developer mode usually pops up the Configure Third-Party Inference window automatically. If it doesn’t, open it manually from the top-level Developer menu → Configure Third-Party Inference….
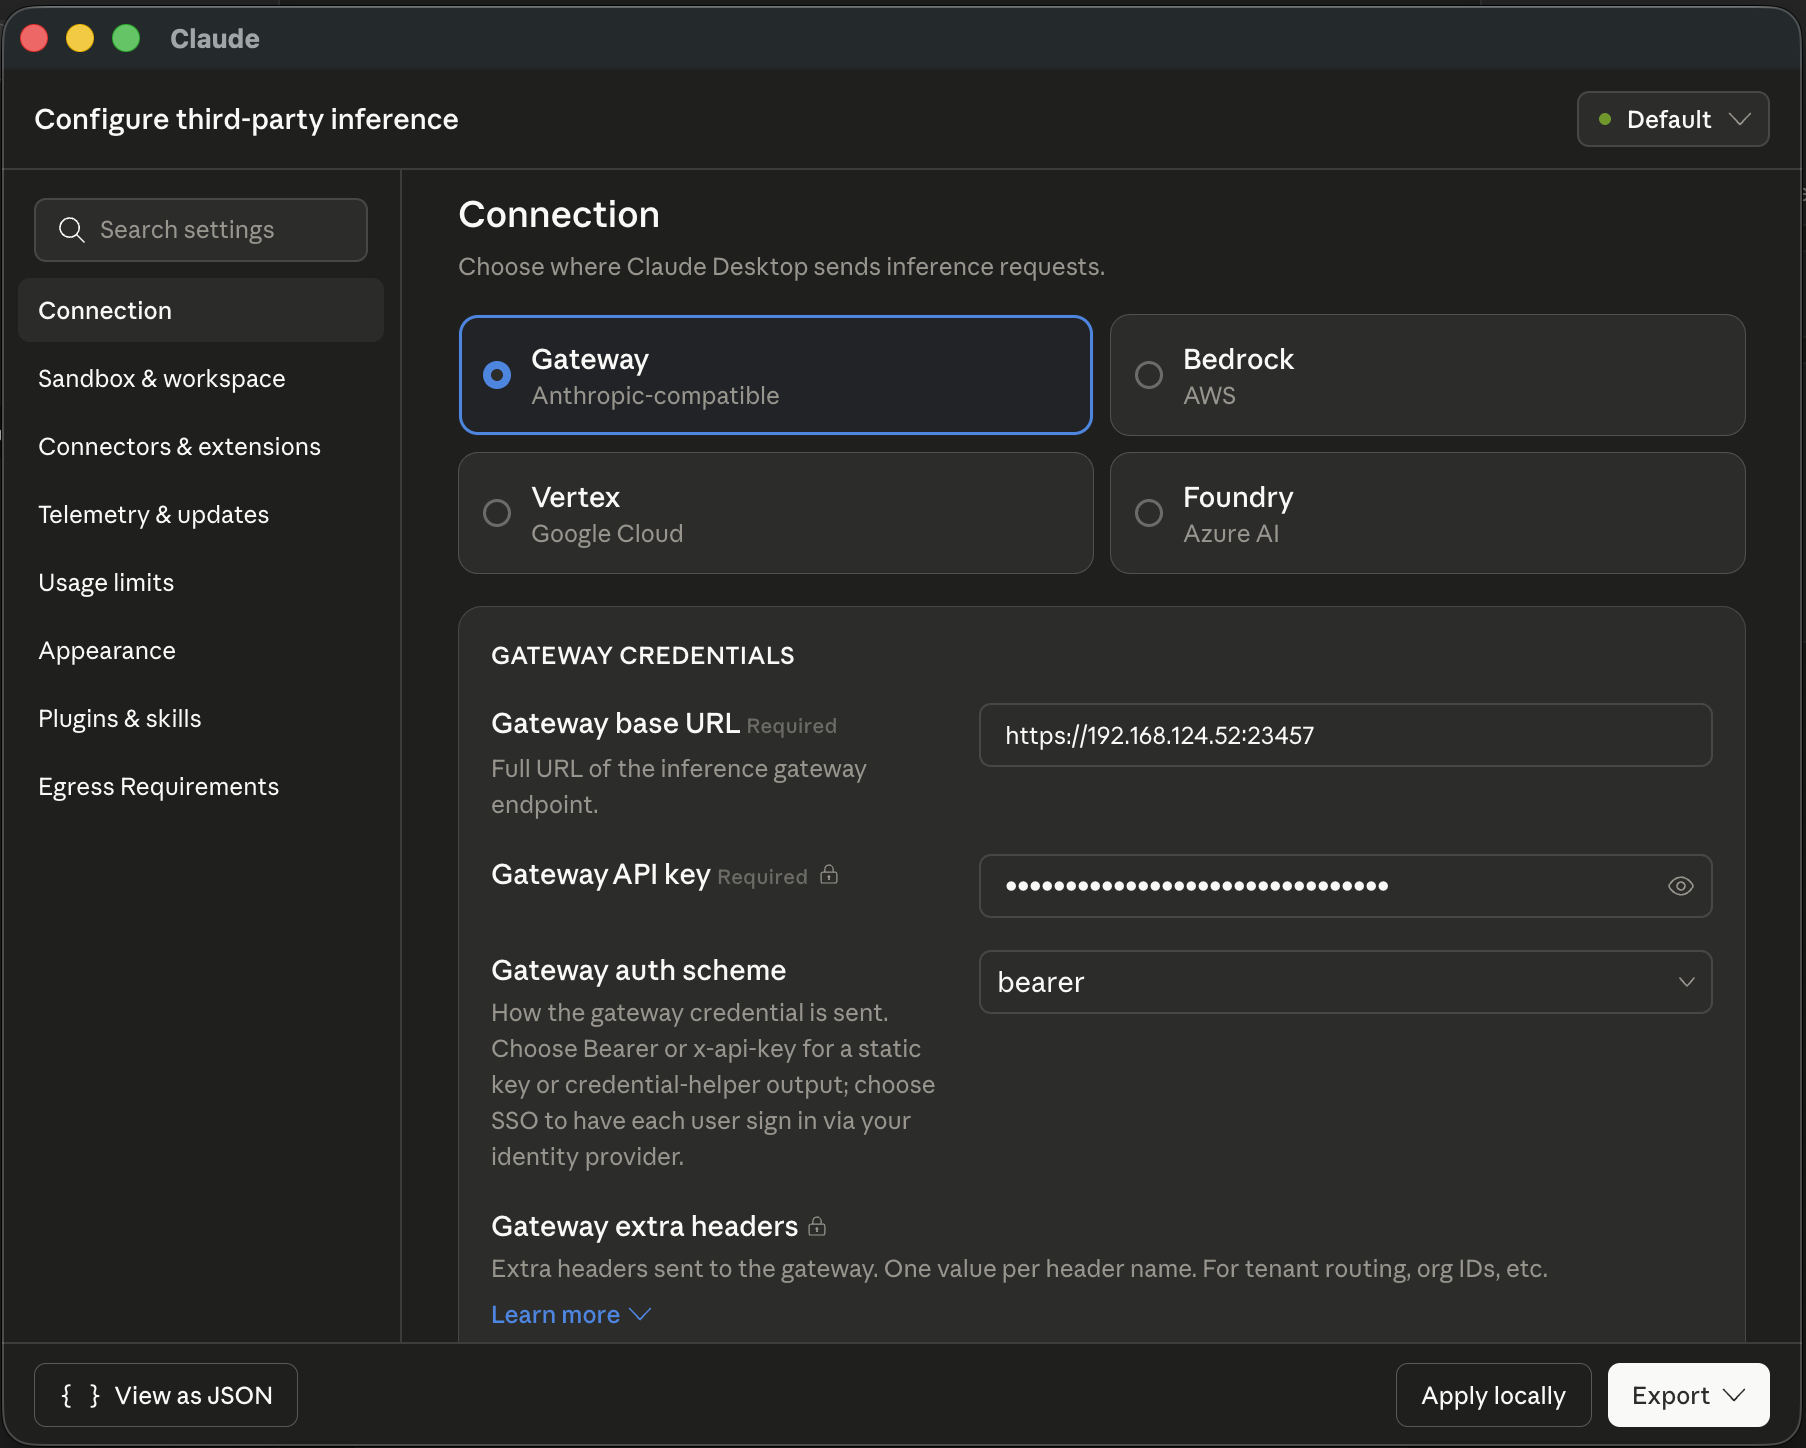
In the Connection tab, select Gateway (Anthropic-compatible) and fill in:
- Gateway base URL
- Template:
https://<cc-router host IP>:<HTTPS port> - Loopback example:
https://127.0.0.1:23457 - LAN example:
https://192.168.x.x:23457(provided that IP was added to Extra SAN in Step 2, the certificate was re-signed, and the remote machine has imported the same CA) - Always match the port to the Actual listening port in cc-router’s Settings page
- Template:
- Gateway API key: paste the token shown on cc-router’s Settings page
- Gateway auth scheme: select
bearer
Click Apply locally at the bottom right to save.
Step 6: Pick a Model and Verify
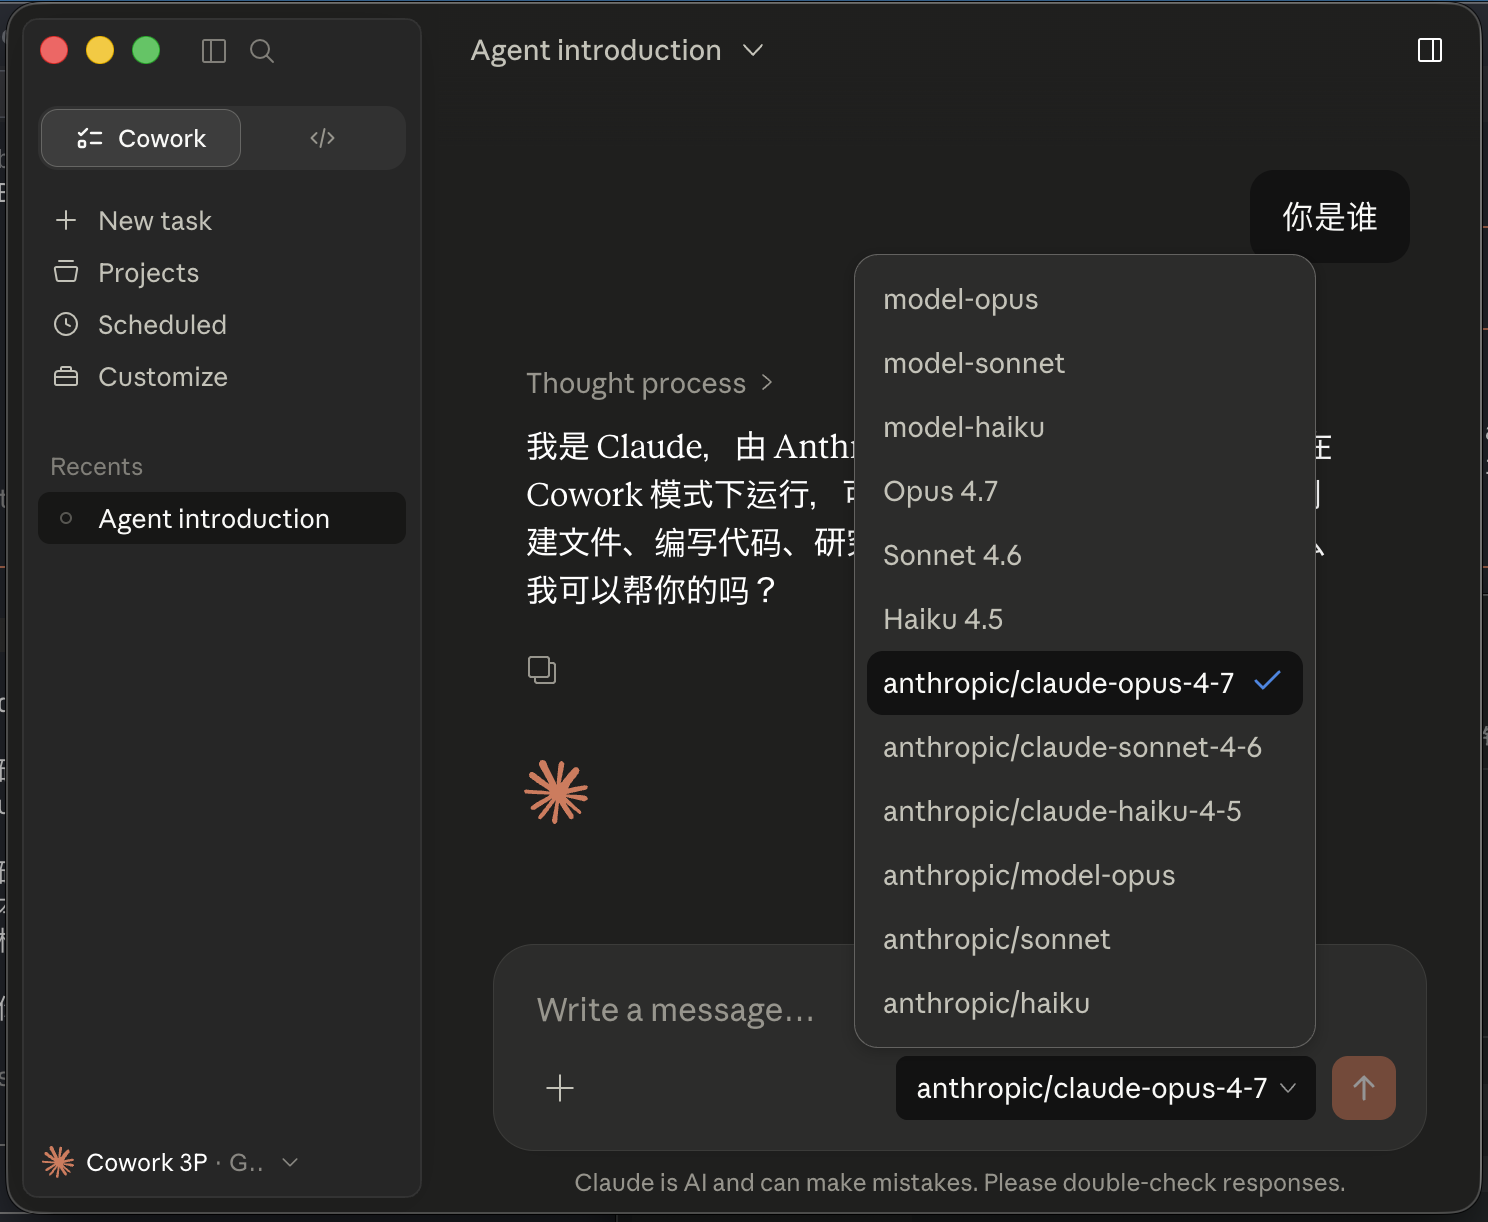
Back on the main Claude Desktop screen, the model picker now lists entries like anthropic/claude-opus-4-7, anthropic/claude-sonnet-4-6, and anthropic/claude-haiku-4-5 — all routed through cc-router to whatever real model you bound. Pick any one and start a conversation.
Open the Request Log page in cc-router’s main UI to watch the routed traffic in real time and confirm which upstream provider each request hit.
Troubleshooting
unable to verify the first certificate/self-signed cert— the CA wasn’t installed or landed in the wrong location. Redo Step 3. On macOS, make sure you added it to the System keychain, not Login.connection refused— cc-router isn’t running, HTTPS isn’t enabled, the port differs from what you wrote, or a firewall is in the way. Cross-check Actual listening port in cc-router and update the Gateway base URL.Hostname/IP doesn't match certificate— the IP or hostname in your Gateway base URL isn’t in the certificate’s SAN list. Add it to Extra SAN in cc-router, regenerate the certificate (the CA stays the same), and restart the app. Other machines do not need to re-import the CA.401 Unauthorized— cc-router may have rotated its token. Re-copy the Gateway API key from the Settings page.
Security Notes
- The Gateway API key grants access to every upstream provider you’ve configured. Treat it as a credential and do not share it.
- Expose cc-router’s port only on trusted networks. For public exposure, evaluate the risk yourself and front it with a reverse proxy plus an auth layer.