Codex integration
This page shows how to use cc-router’s built-in Codex config editor to wire Codex into your aggregated virtual models with a single click. Codex calls every model you have configured in cc-router through the POST /v1/responses endpoint — whether the upstream speaks the Anthropic or the OpenAI protocol, cc-router translates transparently and dispatches to your configured virtual slots.
This is the native cc-router approach: one button writes both ~/.codex/config.toml and ~/.codex/auth.json for you, with no third-party tool required. Codex CLI and Codex Desktop share the same ~/.codex config, so configure once and both work.
Alternative: if you already use cc-switch to manage multiple Codex providers, you can also take the Codex integration (cc-switch) route. The native path on this page is more direct and is the recommended option.
Prerequisites
- cc-router installed and configured with at least one virtual model bound (see Getting Started)
- Codex CLI or Codex Desktop installed (either one is enough — both share the
~/.codexconfig) - Unlike the Claude Desktop integration, the Codex path uses plain HTTP on port
23456— no HTTPS, no CA certificate required
Step 1: Open Integration Guide → Codex
Open cc-router, switch to Integration Guide in the left sidebar, and pick the Codex tab at the top.
The Codex config editor shows and edits two files at once: ~/.codex/config.toml and ~/.codex/auth.json. The Synced badge on each means the editor matches the file on disk.
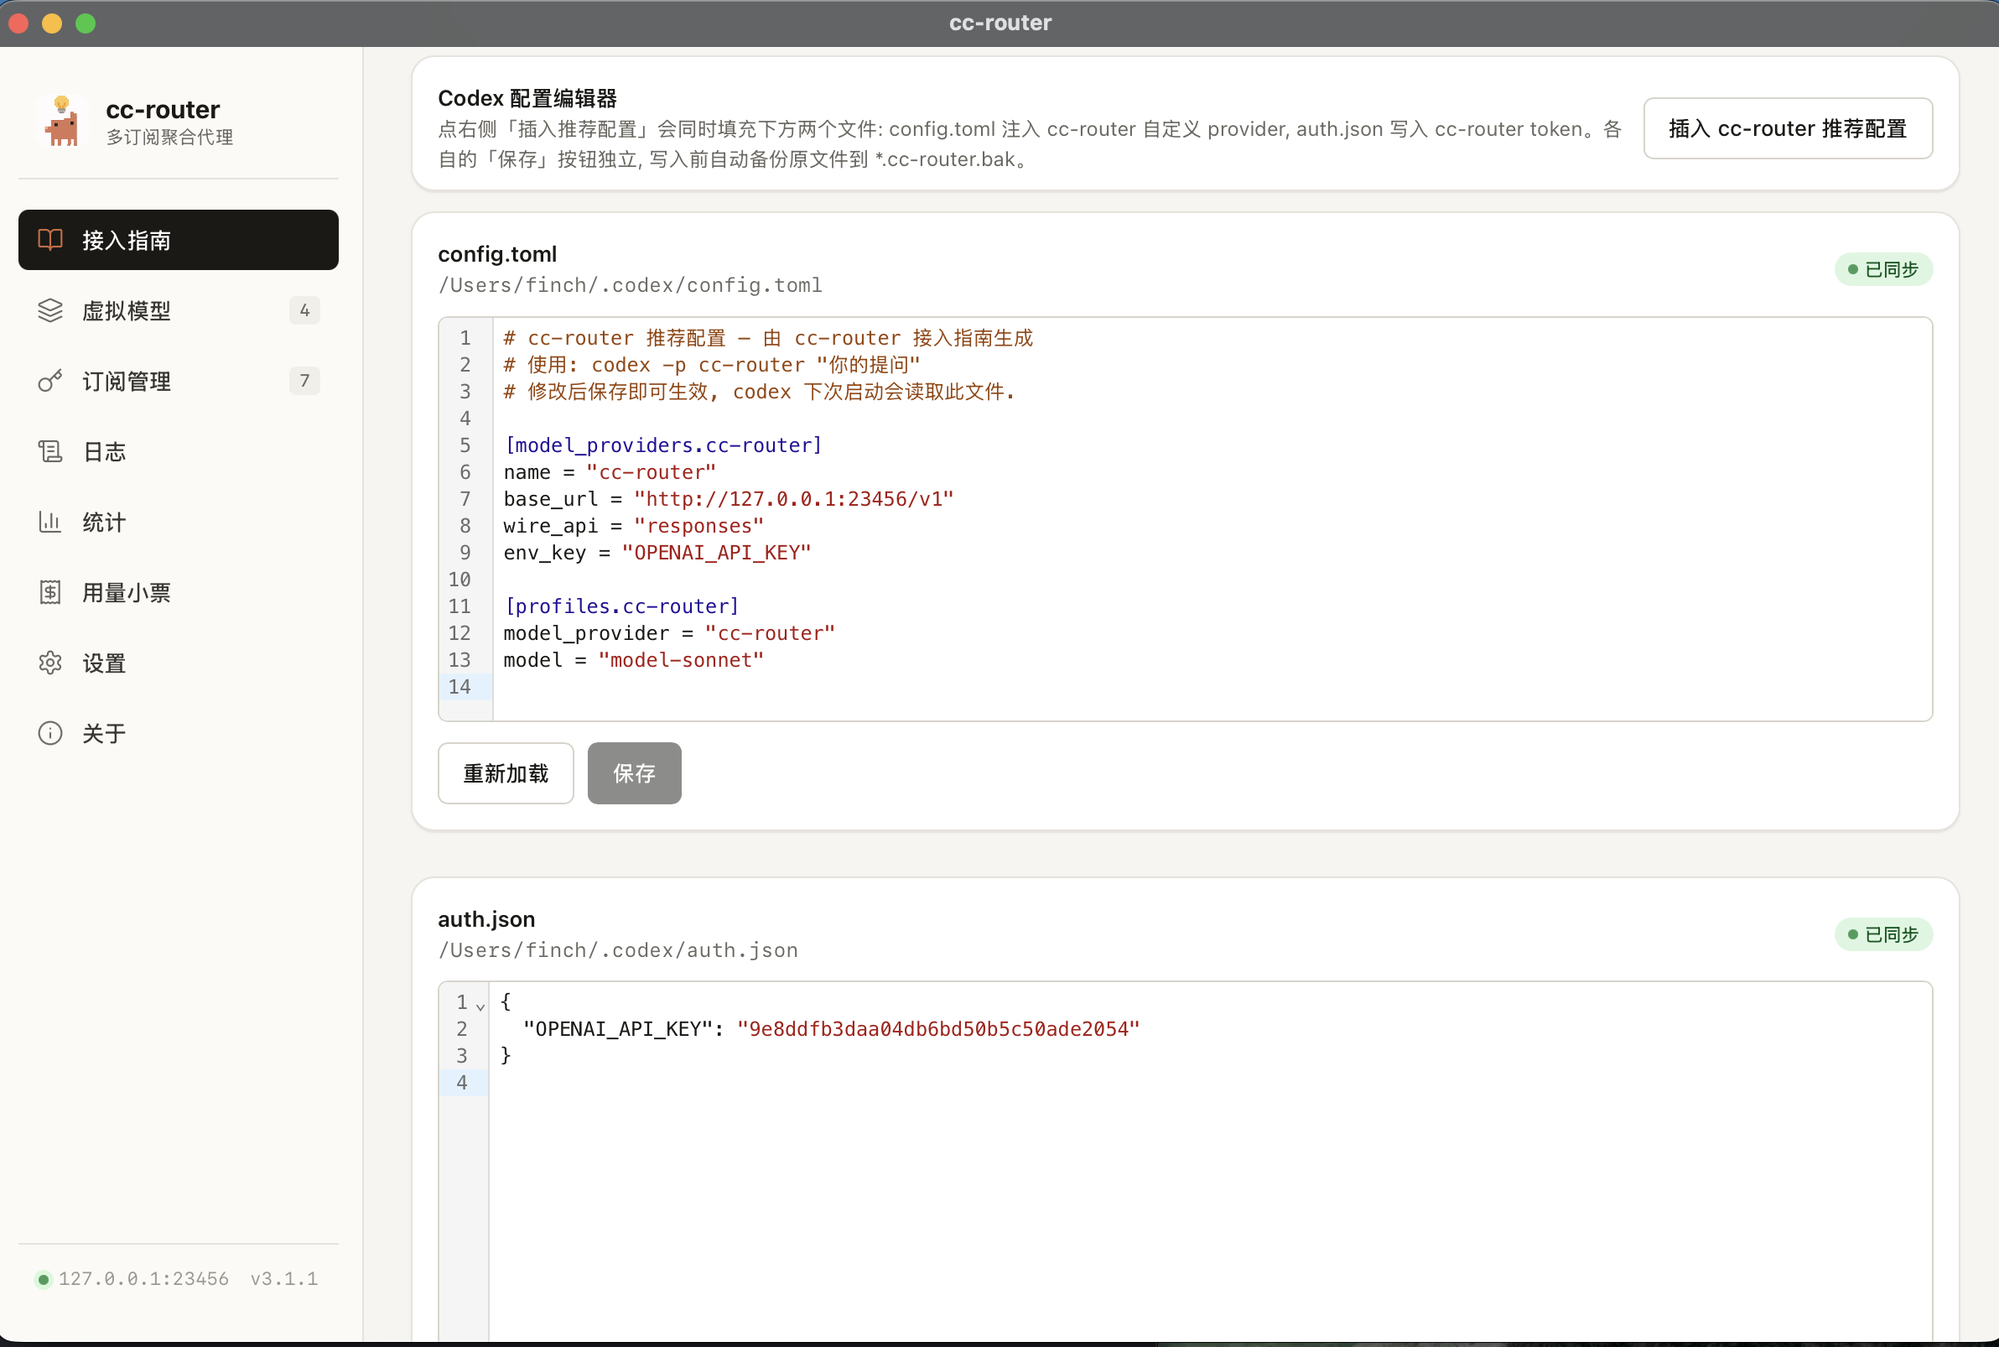
Step 2: Click “Insert cc-router recommended config”
Click the Insert cc-router recommended config button in the top-right. cc-router fills both files at once:
config.toml: injects a custom provider namedcc-routerplus a matching profileauth.json: writes the cc-router token
Automatic backup: before writing, cc-router backs up the original file to
*.cc-router.bak(e.g.config.toml.cc-router.bak), so you can always recover the original even after an overwrite.
Step 3: Save each file
Each editor has its own Save button — click each one to write the changes back to disk. The generated content looks like this:
~/.codex/config.toml:
# cc-router recommended config — generated by the cc-router Integration Guide
# Usage: codex -p cc-router "your prompt"
# Save after editing to apply; codex reads this file on next launch.

[model_providers.cc-router]
name = "cc-router"
base_url = "http://127.0.0.1:23456/v1"
wire_api = "responses"
env_key = "OPENAI_API_KEY"

[profiles.cc-router]
model_provider = "cc-router"
model = "model-sonnet"~/.codex/auth.json:
{
  "OPENAI_API_KEY": "the real token filled in by the app"
}
The
OPENAI_API_KEYis the cc-router token — the same one Claude Code / Claude Desktop use. Theenv_key = "OPENAI_API_KEY"line inconfig.tomltells Codex to read that key fromauth.jsonas the auth header.
Usage
Once configured, launch Codex CLI with the cc-router profile via -p:
codex -p cc-router "your prompt"Switching virtual slots
The model field under profiles.cc-router in config.toml decides which virtual slot is used. Change it to one of the following as needed (save, then it applies on Codex’s next launch):
Set model to | cc-router virtual slot | Best for |
|---|---|---|
model-opus | opus slot | Planning, long-context reasoning |
model-sonnet | sonnet slot | Day-to-day coding |
model-haiku | haiku slot | Tool calls, lightweight tasks |
Key difference from the cc-switch path: the native approach uses cc-router’s virtual slot names directly (
model-sonnet, etc.). This differs from the cc-switch route, which requiresgpt-5.xaliases — the native injection uses the virtual slot names cc-router exposes on/v1/responses.
Codex Desktop shares the same config
Because Codex CLI and Codex Desktop read the same ~/.codex config, Desktop works as soon as the above is set up. If Desktop was previously signed in to an official OpenAI account, restart Codex Desktop once for the config to take effect, then pick the cc-router profile in the model selector.
LAN sharing
If Codex and cc-router run on different machines, change base_url in config.toml to the LAN IP of the cc-router machine — the /v1 suffix must stay:
base_url = "http://192.168.1.50:23456/v1"Use your own IP; the port follows the “actual listening port” shown at the bottom of cc-router’s Settings page.
Verify
Back in the cc-router main window, go to Logs → Request log in the left sidebar, run a Codex conversation, and you should see the request recorded — the Client column shows Codex CLI or Codex Desktop, the Virtual model column shows the slot, and the Real model column shows the upstream it was finally routed to.
Troubleshooting
404 Not Found—base_urlis missing the trailing/v1. cc-router’s Responses endpoint lives at/v1/responses, so without it no handler is found. Usehttp://127.0.0.1:23456/v1.401 Unauthorized— the cc-router token may have rotated. Return to this page, click Insert cc-router recommended config again, then Save both files to write the latest token.- Profile not applied — you forgot
-p cc-routeron the CLI, or you didn’t restart Codex Desktop after switching. model_not_found/400 model is required— themodelfield is misspelled. The native path requires cc-router’s virtual slot names (model-opus/model-sonnet/model-haiku).- Want the original config back — cc-router already backed it up to
*.cc-router.bakbefore writing; rename it back to restore.
Security notes
- The
OPENAI_API_KEY(the cc-router token) is an access credential — equivalent to calling all your upstream providers directly. Do not leak it or commit it to a repository. Note that~/.codex/auth.jsonstores it in plaintext. - Only expose the cc-router port on a trusted LAN; assess the risk yourself before exposing it publicly, and harden it with a reverse proxy plus an auth layer.